


Yoast SEO is the Best WordPress SEO Plugin. After installation of WordPress, you should install and configure Yoast SEO Plugin.
Yoast SEO offers a complete set of tools to optimize and improve your website SEO. However, misconfiguration of SEO plugin leads to various SEO-related issues. Here is the complete Yoast SEO WordPress Plugin installation and configuration guide.
Key Features of Yoast SEO Plugin
- Focus Keyword testing and analysis facility.
- Title and meta description facility per post and page.
- Google search result snippet for desktop and mobile versions.
- Breadcrumbs support a configuration of categories.
- XML site map generation facility for posts and images.
- Post-readability analysis for SEO.
- Social website integration.
- Ability to verify Webmaster tools.
- Bulk Editing of Title and description for the posts.
- File Editor facility for robots.txt and .htaccess.
The Premium version provides the following additional features.
- Ability to use multiple focus keywords in the post and pages.
- Internal link suggestion for improving SEO.
- A redirect manager to set up redirects.
- A facility to export focus keywords
- Video tutorials to understand the features of the plugins.
How to Install Yoast SEO WordPress Plugin?
To install SEO WordPress Plugin, you need to log in to the WP admin panel. For more details, you can visit the complete guide of – How to create a website and install WordPress?
After login to the WP admin panel. Visit the Plugins section from the left navigation bar. Click on Add New and search for “SEO Plugin”, You will find the Yoast SEO plugin. Click on install now.
Your plugin will be installed. Now click on Activate. Upon activation, you will be able to see a new menu item called SEO in the left navigation panel.
Once you have activated the Yost SEO plugin next step is to configure it.
How to Configure Yoast SEO WordPress Plugin?
The steps for the configuration of the Yoast SEO WordPress Plugin are given below.
#1 General Settings
On clicking the SEO icon, you will be able to see various tabs. Click on the General Setting.
You will be able to see the setup wizard. You can enter various information and configure this plugin. As we want to do manual configuration we will avoid this step.
On General Setting Tab you will find Dashboard, Features, and Webmaster Tools tab.
On the dashboard, the entire SEO status will be visible. In the features tab, you need to configure the following settings.
- SEO Analysis – On
- Readability Analysis – Off
- Cornerstone content – On
- Text link counter – On
- XML sitemap – On
- Ryte integration – On
- Admin bar menu – Off
- Security: no advanced setting for authors
Press Save changes.
#2 Search Appearance
On clicking Search Appearance, you will be able to see various tabs. General, Content type, Media, Taxonomies, Archives, Breadcrumbs, and RSS.
General
In the general tab, you need to provide the Homepage SEO title, Meta description & Knowledge Graph & Schema.org settings.
The mentioned title and description will be visible in the search engine. You should use a keyword in the title. You can use a dash as a separator. In the description, you should include topics that you are including in your blog.
For the knowledge graph setting select Organization and upload an image as the organization logo.
Content Type
Now go to Content-Type and select post-related settings as shown in the image below.
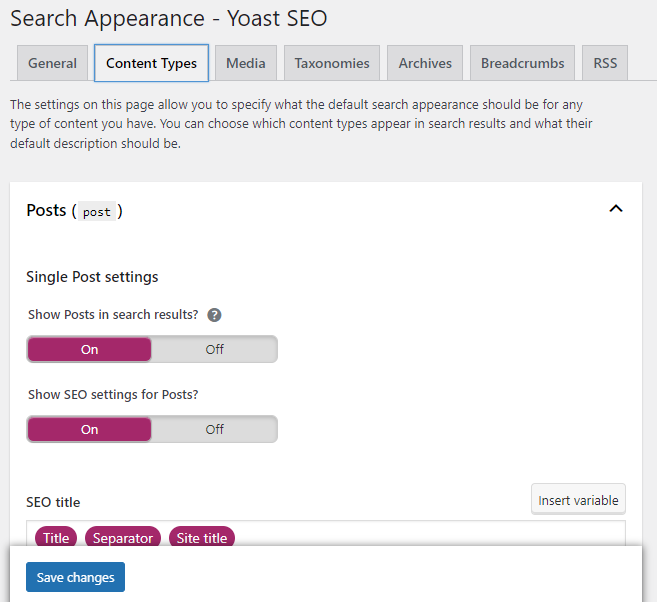
These settings are related to search appearance. The default options would work for almost all websites.
Media
By default, WordPress creates a new page for each image or media you upload to your website. These attachment pages have no significance and if it appears on search engines it will reflect the low quality of your website. Thus to avoid Negative SEO make sure to select this setting as Yes.
Redirect the attachment URL to the attachment Yes.
Taxonomies
On the taxonomies tab, you can configure titles and meta for categories, tags, custom taxonomies, and post-format archives.
The default template works in most cases, in the taxonomies, make the setting as per the image given below.
Breadcrumb
For breadcrumbs, it is advisable to keep it enabled with separator you can select a category as Taxonomy to select for breadcrumbs. Breadcrumbs guide the visitor to know about the section user is visiting. These breadcrumbs also appear in search results giving an extra advantage in the search.
#3 Social
In the social tab, you will find various options related to social profiles. In the first tab of accounts, you need to mention your social profile URL.
You need to provide Facebook URL, Twitter username, Instagram URL, Linkedin URL, YouTube URL, and Pinterest URL.
You also need to set Add open graph metadata for a social profile on this tab.
#4 Tools
Yoast SEO plugin comes with advanced tools that can be used for performing advanced tasks.
Import & Export
Under Import & Export section you can import the plugin data and configuration. Suppose you have already set up an SEO plugin you can use this tab for importing data to Yoast SEO. Similarly, you can export the data from this plugin via Export.
File Editor
The file editor tab is given here to edit important files such as robot.txt and .htaccess files. Both these files are important and create a huge impact on SEO.
Bulk Editor
Bulk Editor allows you to quickly edit the post in the bulk. You can add SEO titles and descriptions for all your blog posts and pages.
Here you will find two tabs Title and Description. In the title tab, you will be able to edit the Title in bulk, whereas in the description you will be able to edit the description in bulk.
Over to You
We hope this guide helped you in installing and setting up Yoast SEO WordPress Plugin. If you have queries about the installation and configuration of the Yoast SEO plugin you can post them in the comment section given below.